Hazard Course
Noone actually needs a walkthrough for a training course, but as in many other situations, Poke646 offers more than meets the eye: After you finished the hazard course by shooting all targets in the shooting range, jump onto the container to the right and onto the metal crate from there. Shoot the vent grate and walk through the ventilation system... you'll be surprised where you will end up!
Chapter 1: Audion Industries
Map 1
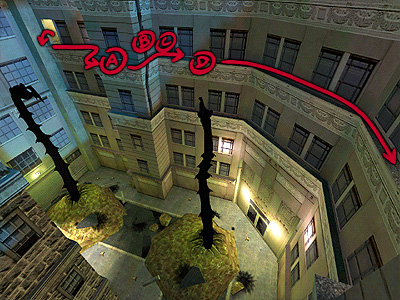
After you wake up with a bad headache, pick up the IUIC in front of you. Leave the chamber and connect to the IU for your first briefing. The generator has no power yet, so you need to leave the hall and activate it. To achieve this, follow the path on the picture below:
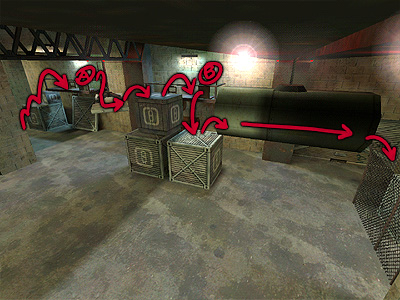
Some people seem to have problems in getting onto the first crates, so here's how to: jump forward onto the crate and press the "crouch" key midair to gain extra height. Keep it pressed until you land on the crate. This is the so called "crouchjump" which you should've already learned in the hazard course of the original HL.
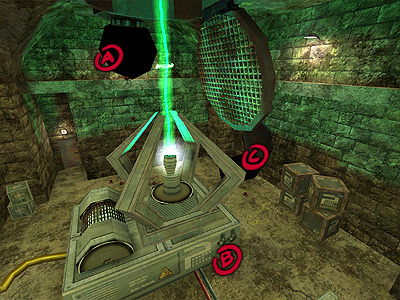
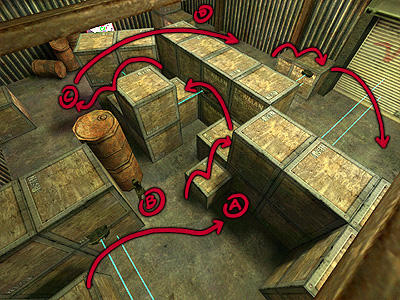
Activate the crane on the first platform (A), pull over the hanging metal plate as far as it will and jump it to reach the middle crates. Activate the 2nd crane (B) and let the pipe form a line with the crate and the fence. Jump the crate and walk through the pipe into the fenced area, onto the crates, into the vent shaft.
Out of the vent shaft again, activate the warehouse power supply by pulling the switch. Leave the room and go downstairs, avoid the spawning headcrab until you find your first weapon. The heaterpipe lies next to the bursted radiator, pick it up and fight your first battle :) Don't forget to gain health by using the soda machine!
Smash the glass door and enter the warehouse again. Hit the generator switch and watch it spin up. Do this from a safe distance, otherwise the explosion of the wall (caused by a reflected beam) will do you damage. Leave the level through the hole in the wall.
Map 2
Jump the pipes and smash the vent grate. Leave the building and jump on the crates and over the fence. An alien slave will spawn, run around the next corner and wait for him to follow you, this will make it easier to kill him with your lousy "firepower". Follow the path to the "Gilmore" sign and smash the crates in the archway. This will reveal a zombie, but also the bradnailer as your 2nd weapon. Make sure to check the other crates for goodies. Follow the route to the crane with the 2 zombies, kill them and push the crate in the corner over to the crane. Activate the crane, jump the crate, from there the crane and finally the blue wall.
The upcoming container maze has two possible ways to go, the "long but safe" and the "short but dangerous" route:

Follow the blue path if you're in for a safe ride. Don't forget to collect the goodies at the bullsquid (A) (as a reminder: all crates with "Poke646 Supplies" on them are breakable and usually spawn goodies). Face the 3 more spawning alien slaves (B), enter the brick building and go upstairs to reach the balcony (C). From there you can easily shoot the houndeyes from a safe distance and collect the goodies in the crates after you killed them.
Follow the red path if you're more daring. Kill the houndeyes eye to eye and enter the brick building. Collect the nail clip laying beneath the spiral stairs and another one in a crate on top of the stairs. If you like, you can go back all the way through the container maze and collect the stuff in the crates, but be warned that the enemy placement will be more tricky from behind!
(Tip: If you ever encounter problems in killing a bunch of houndeyes, do the following: once one starts to load up a shockwave, shoot it one time. You don't need to kill it yet, it will still make its sound but abort the attack. This way you can just switch from beast to beast and unload a couple of shots into them until they finally die.)
Leave the level through the two walkways leading out of the brick building, but be warned that there will be a zombie spawning last second!
Map 3
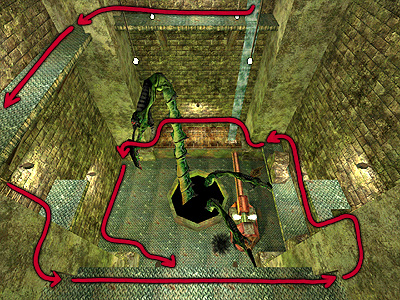
Appeoach the large hall and try to kill all viewable enemies from the platform upstairs first. Now you've got time for this tricky puzzle: you need to activate the acid flow in order to fill the pool, therefor you climb the ladder left to the entrance and hit the flow control switch. Then you need to smash the chainlink fence on the small platform and push the metal crate into the acid. It will now float at a stable height (which it wouldn't do if you hadn't filled the pool yet). Jump the crate and from there to the other side of the pool, be warned that a portal will spawn a slave midair! Climb over to the exit of the hall where a 2nd slave will spawn, make sure you smashed all the crates in the hall for goodies and leave the hall through the exit.
Smash the crate beneath the stairs for a medibox. Leave the building and approach the ladder on the wall. While trying to climb it, it will crash, caused by several alien portals. Immediately turn around and kill the new spawned enemies. Now that the ladder is gone, jump this path to reach the door it was leading to:
(Tip: In order to safe valuable ammo, play the above scene once and remember the enemy spawnpoints. Load a saved game from before the crash and push the explosive barrels into the right positions BEFORE you climb the ladder. After that it's much easier to kill all enemies with just 2 shots into the barrels.)
Follow the route to the giant silo. Kill the alien controller, there's some ammo on the ledge if necessary. Smash the chainlink fence and jump the hanging crate, this jump is tough so you need to crouch midair in order to land. Jump the 2nd crate and the ledge from there. Kill the zombie and walk towards the door. The ledge will crash, there's no way to avoid this... this is just tricky leveldesign :) However, leave the water and crouchjump into the pipe and out of the level.
Map 4
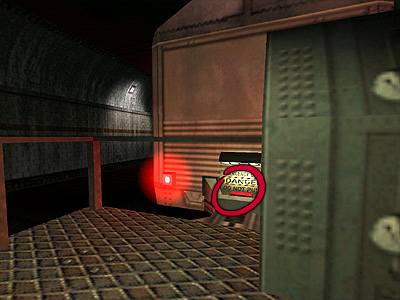
Kill the 2 zombies, leave the sewers and connect to the IU in the van first. Smash the surrounding crates for lots of stuff. Be careful with the huge crate containing the nailgun: once it is broken, a bullsquid will spawn nearby, be prepared for that. Run down the road to the factory, houndeyes will spawn. You shouldn't waste the explosive barrel on them, especially if you're having trouble in killing the alien grunt to the right. Alarm him, run back and make him follow your path. Shoot the barrel to kill him effectively.
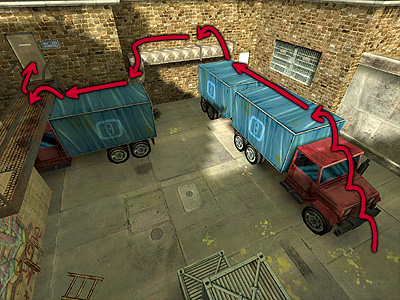
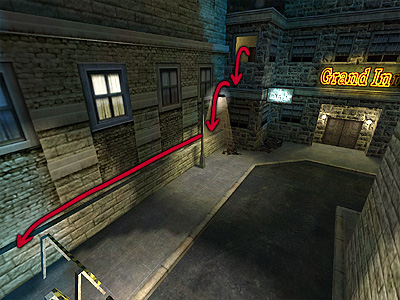
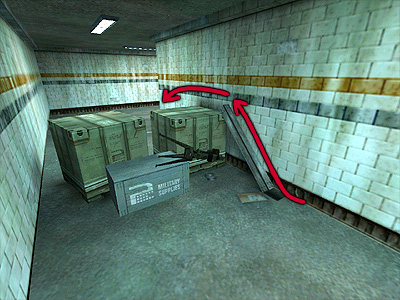
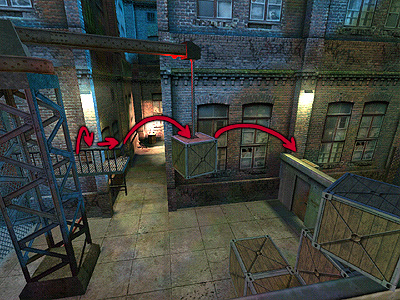
Follow the T-road to the left, jump the handrail from there onto the crates and onto the balcony as shown in the screenshot below:

(Tip: you can kill the bullsquid and the headcrab on the opposite site of the map at ease from this safe distance with a single shot into the explosive barrel beneath the headcrab.)
Hit the switch to open the gate below, be aware of the headcrab in the vent shaft. Jump down the balcony again and surround the building to reach the gate. Behind the metal container at the bullsquid you'll find some goodies, proceed to the gate and kill the alien grunt. There's another medibox in the crate, leave the map by smashing the manhole cover of the sewer.
Chapter 2: The Sewers
Map 1
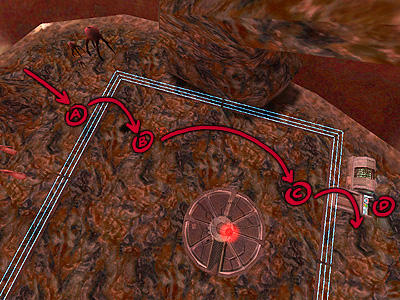
Follow the sewer pipe to the right, walk straight past the T-intersection for now and turn to the left at the end (see Route A on the screenshot below). After killing the zombie you should climb into the small entrance to the left and head up. Smashing the crates will give you your next weapon, the pipebomb, but also block your way back down when the pipe explodes. Smash the other grate in the room and proceed to the small silo, the route from there on is quite self-explanatory, you will drop back to the T-intersection near the entrance of the sewers.
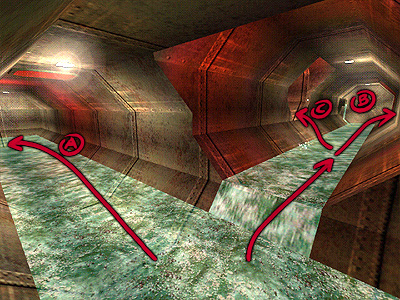
Proceed into the other pipe now and choose the path to the right (Route B), hit the wheel at the end to open the door. You can already try to kill the ichtyosaur below by throwing pipebombs through the grate into the water, but the next room offers even more of them. When you approach the door to the right, two zombies will blast through it. Kill the bastards, collect the goodies in the crates (most NCSA crates will spawn goodies, so make sure to check them all while you're down in the sewers) and hit the switch inside of the room to open the main gate underwater. If you haven't done it by now, you should kill the ichtyosaur because all your weapons won't fire underwater.
Follow the pipe back to where you came from and enter the last possible route (C), leading into the water. Swim through the now opened gate and climb up the ladder. Kill the spawning alien slave and smash the crate on top of the platform to reveal yet another pipebomb. The door is blocked by crates, explode these by throwing a pipebomb across the fence like you learned it in the hazard course. As you can guess by now, wasting all pipebombs before (even the one in the last crate) won't let you leave the map so be sure to have one when you want to proceed :) Leave the map by opening the door with the wheel.
(Tip: the method of "jumpthrowing" an explosive doesn't only appeal to the pipebomb in Poke646, it is also possible with satchels in the original HL. This gave me a huge tactical advantage back in the days when HL DM was still popular :))
Map 2
Make your way down and into the large room, your way back will be blocked by an explosion. In the hall wait to kill the 2nd alien slave (the one further away from you) until you have collected all other items in the room because he will trigger a water flow which will flood the entire map, no time left for fighting once it starts. In order not to drown you need to follow the right path:
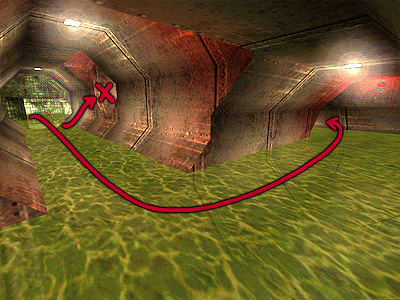
As you can see, don't turn left but rather swim to the end of the pipe and then left and once again left. This will automatically bring you to a ladder leading to the level exit. Kill the aliens on the platform from hanging on the ladder (it's the easiest way to survive the combat), collect the goodies in the crates and leave the map.
(Tip: If you're running out of air underwater, you can swim back into the larger hall and up the pipe to reach the water surface and breathe)
Map 3
Be prepared for some heavy combat in this one! First off kill the 2 houndeyes and stuff yourself with the items in the crates. By now the alien grunt should be busy having his meal with the NCSA employee so you should be able to sneak up from behind and kill him, along with his friend, the zombie. Smash the crates for even more stuff. Down on the ground you find the first informal note of the game, hit the use key to read it (like you learned in the hazard course).
Oh oh, some bad things are going on down here! But although he warned you and since there's no other way out, you need to smash the wooden barrier and crawl into the pipe. Once you turn around the corner, you need to hurry: the whole pipe will collapse within seconds and your only way to survive this is to smash the next grate and crawl out of it.
Follow the path to the giant hall but don't enter it yet. Kill the alien controller to your right from your safe place and wait until the tentacles calmed down a bit. If you have a pipebomb, try to throw it down to the "lunch scene" with the alien grunt and the zombie. This will distract the tentacles, kill the enemies and therefor make it easier for you once you're down there. Now jump out of the duct, proceed to the right and carefully make your way down to the ground as seen below:
In case you missed this chapter in the real Half-Life: tentacles are blind, but they can hear very well so your best bet to survive is to sneak around them carefully and throw some pipebombs every now and then to distract them. The bullsquid on the floor isn't really a threat, if you wait long enough it is likely that it's killed by a tentacle strike. Once you leave the hall you stumble across the Xen Squasher, your 4th weapon. Pick up the ammo (candy box) for it as well and leave the map.
Map 4
The XS comes in quite handy here: it's the best weapon to nail down the alien controllers in the stairway. Don't forget to collect the goodies in the crates downstairs and make your way up. Make sure to shoot the first hanging barnacle as it contains XS ammo. Once upstairs, you've reached the 2nd generator. Kill the houndeyes first and connect to the IU for another briefing. Before activating the generator, make sure to smash all crates and collect their goodies, things will get pretty hectic from now on.
As you can see in the screenshot above, once you activate the generator, an earthquake will cause the large metal door on the ceiling to drop down and reveal a nest of snarks (A). To avoid these, crouch down in front of the generator (B) so they can't see you yet. After a couple of seconds, another door to the right opens (C), run into it and let yourself fall down the endless pipe into the water basin. Jump out of it, kill the bullsquid and all other snarks that might have followed you down the pipe. Leave the map through the door and the stairway leading down.
Map 5
Enter the NCSA staff room and kill the alien slave. Collect the Xen Squasher ammo on the table and refresh at the soda machine if necessary. Now walk over to the board on the wall and read through the note. Now you should have a first clue how to navigate through the upcoming maze.

After leaving the staff room through the door and reaching the first T-intersection (A), turn right, then left and left until you reach the next T-intersection (B). Two zombies will come in from the right, make sure to kill them now as they will otherwise follow you throughout the whole maze! Walk straight up into the dead end (C) with the pipe coming out of the wall (attention: headcrab!) and smash the crate for a nailgun. Walk back and turn left into the T-intersection (B), left again, then right and left (D) and kill the houndeyes coming from the right. Collect the stuff from the crates at their spawn point and climb the ladder where you came from, but be careful as 2 headcrabs will jump at you. The NCSA worker they just killed leaves some weaponry, climb down on the other side.
To kill the alien grunt down the long path (E) you should best wind up the Xen Squasher (secondary fire mode) and place a direct hit. After you killed him, you don't need to walk down that path, just walk straight ahead and turn right two times. As you can see, the route left leads into the Twain street (F), just where the library is located. But as you approach the exit, a mighty Gargantua stomps over the surface and the earthquakes make the sewer collapse.
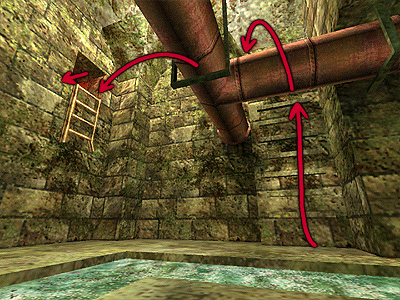
Time to find another way out, so head back to the red pipe on the ceiling and climb up the stone stairs on the wall, from there onto the pipe and jump into the small hole in the wall. Follow the path, smash the grate and jump on the ladder (avoid the explotoad!) to find your way out of the map.
Chapter 3: Nation City Library
Map 1
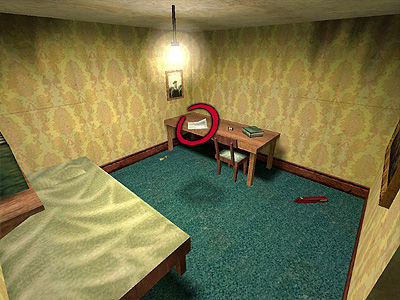
Out in the city again, get rid of the spawning headcrabs and walk down the stairs into the building. Don't turn right at the end yet, you'll gain more firepower in this map which helps you big time to get rid of the alien grunts. For now turn left into the basement and kill the zombies, you'll find some stuff within the crates in the corner. Walk upstairs into the house, turn right and walk up the stairs to the 1st floor. The only door that'll open is the last one to the left (No. 4), enter it and get rid of the alien slave. This room obviously belongs to a hunting fanatic, that's your luck as he left a bow rifle for you! Don't forget the medibox in the locker and enter the bedroom where some rifle bolts lay on the ground for you. Read the note on the table, the knowledge of the code will now open the garage door for you.
Out of the room again, an alien slave will spawn at the end of the hallway, be prepared for that. Walk down the stairs again and enter the basement where you killed the zombies. Walk up to the 2nd basement exit (where you avoided the alien grunts first) and fill the bastards with rifle bolts (much easier now, eh?). Now that you know the code, you can leave the map by activating the keypad on the garage door.
Map 2
Follow the archway and jump into the container to the left for some goodies. If you want (or need) to avoid close combat with the bullsquid awaiting you, do the following: shoot the hanging barnacles from a distance and wait for some seconds. The bullsquid will be attracted by the gibs and come out of its hiding spot, kill it from a safe distance.
Leaving the backalley, there's 2 ways to follow the main road, turn right for now (get rid off the alien grunt from a safe distance, he'll only attack if you disturb his lunch). Kill the bunch of houndeyes and follow the road to the end with the stairway. There's 2 crates with goodies behind the container at the lantern, make sure to avoid the headcrab on the container. Walk up the stairway into the building, an alien grunt will spawn behind you, be prepared for that. Inside of the newspaper building (which is packed with the names of the "Daily Planet" staff from "Superman", in case you didn't know), the only working door is the one to Perry White's office. Look around for some goodies and read the note on the table, the knowledge of the code will once again help you to open a gate somewhere else in the map.
Leave the building just where you entered it, some new friends will have spawned to greet you. Walk down the main road and past the "Federal Reserve Bank". Be careful where the road turns left, 2 slaves and 2 flying controllers will give you a hard time. Turn right into the small backalley at the "Nation City Daily News" sign and get rid of the slave and headcrab. Jump the container and the crates to reach the ledge (attention: headcrab!) which holds lots of goodies for you.
Back down you should've killed all aliens for now and can safely approach the keypad gate at the barricades and open it to gain access to the stairway. An explotoad needs to be avoided here, another 3 zombies await you up on the bridge. Don't enter the newspaper building yet, there's a bonus room with lots of stuff:

Jump over the handrail of the bridge and walk on the ledge of the bank building to reach the opened window. Collect the stuff in it and let yourself fall down on the container to avoid damage. Walk around the building and through the garage door again.
Inside of the newspaper building again, turn left for another soda machine (in case you need it) and leave the map through the emergency exit and the following small bridge.
Map 3
The door at the end of the hallway is locked, so you need to crawl a bit through the vent system to your left. At the end of the vent shaft, an explotoad waits to your left. Shoot it and immediately turn right into the maintenance room to avoid damage. Here you'll find some more goodies for your journey. Out again you have to face an alien slave down the hallway, your favourite weapon in this map should be the Xen Squasher since there's lots of ammo for it.
Up the first set of stairs, a bullsquid and 2 headcrabs await you, you can once again get the bullsquid to leave its hidespot by shooting the barnacle. Up the 2nd set of stairs, there's an alien grunt waiting in the corner which should be shot from the stairway to avoid close combat. On the 2nd floor follow the hallway to another maintenance room with some goodies (you'll especially need the rifle bolts in the next scene). By now you should be able to see the tentacles which make all that noise. Shoot the window from a safe distance and wait until the tentacle calmed down a bit.
Leave the window and jump onto the ledge of the hotel building. You now need to surround the entire building on that ledge, see the screenshot below for some details which should ease your pain:
The first difficult scene will happen at (A). Select the rifle and approach that spot carefully while already zoomed in. You should be able to spot the alien controller behind the opposite building, as soon as you can get him you should do so and immediately step to the left (otherwise the right tentacle will hit you). Wait a bit until the tentacles calm down or distract them with a pipebomb (maybe you can make some hits on headcrabs with that one, too?) before you smash the rainpipe (B). Run into the next corner (C) fast enough and you're safe from tentacle hits. At (D) the ledge will collapse and you'll have to wait again until the tentacle calms down.
Once you reach the fireladder, you should be able to see yet another alien controller hiding behind the building, get rid of him and climb down. There's two aliens waiting for you down the road, kill the alien slave first while the grunt is still busy eating. Enter the "Grand Inn", turn right and get behind the counter of the bar for your next weapon: a sawed-off shotgun, coming along with a handy package of ammo. Read the note for the code to get upstairs, after that hell will break lose in the bar and after everything is destroyed, 3 slaves will have spawned (no problem with your new shotgun). For a small recreation break, make sure to check out the jukebox :)
Walk through the bar, pass the entrance and turn to the left to gain access to the stairway, on the middle there's another room to the right with a zombie and goodies as a reward. Smash the window on the 1st floor and let yourself fall down onto the ledge outside:
Surround the barricades by walking on the ledge and kill the bullsquid around the corner. Leave the map by jumping onto the container to the right and over the barricades.
Map 4
First off: don't try to kill the Gargantua, you can't.
Instead of unloading all your ammo into him, smash the manhole cover (A) and climb down into the sewers. The way through the sewers is fairly easy: turn left and walk straight up, passing the Gargantua standing above you. But don't stand there too long staring at him, a nest of snarks is opening and you really need to run from there on. Follow the path to the end, then turn right and climb up to the surface again (B). You should automatically face the level exit (C), walk towards it and an airstrike will solve your problem with the Gargantua.
Map 5
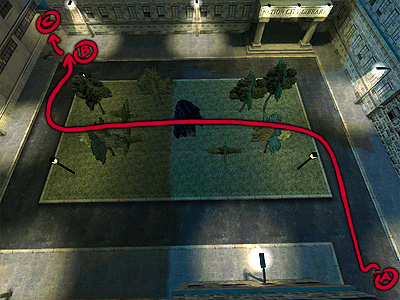
Take down the alien controller first before doing anything else, connect to the IU in the van and read the briefing carefully. Now you know that the hidden entrance to the Poke646 bunker is in the "biology" section, time to get there! Break the surrounding crates for lots of stuff and enter the library through the side door.
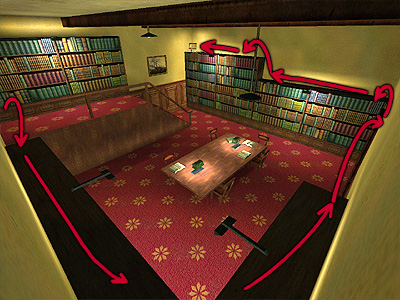
Down the first hallway enter the door to the right into the housekeeper's room. Read the note on the table to find out where he placed the key to the "rare books" section. Leave the room and follow the hallway into the great hall with the mirrored marble floor. Study the chart to help you orientate inside the library. Walk upstairs and turn left (walking to the right will lead you into a dead end), kill the hanging barnacles (don't forget to collect the candy) and enter the "geology" section to your left. Kill the houndeye squad and walk up the small stairs leading to a narrow hallway. Kill the barnacle and turn left (don't walk up the spiral stairway yet), now you're entering the "music" section from behind, making it much easier to get rid of the houndeyes. After you killed them and collected the goodies in the cupboard on the opposite side of the room, make your way back to the spiral stairway.
Upstairs turn left into the maintenance room for some goodies and head back into the hallway. Get rid of the alien grunt to your right and proceed to the end of the hallway. To your right you see signs leading into the "law" and "biology" sections (where you need to go to). But walking through the door will open a portal spawning an alien grunt, be prepared for that by choosing the right weapon before this encounter :)
The heavy explosions make the floor collapse so this way into the "biology" section is blocked. But the explosions also blew a hole into the wall (s. screenshot) through which you can get behind the dead end you might have seen earlier in the level. Kill the alien slave and leave the map towards the "arts" and "rare books" sections.
Map 6
In the marble hall, walk upstairs and turn left. The bullsquid shouldn't cause any serious problems, enter the "arts" section to your right and kill the zombies inside. There's some goodies on the bookshelf which can be accessed by following this route:
Leave the "arts" room again and head right, then left. At the end of the hallway you see the plantpot with the promised key behind it, pick it up. This will open the last door to the "rare books" section, be prepared for another bunch of houndeyes in it. There's a vent grate over the bookshelf to the left, get there by jumping onto the bookshelf from the handrail of the small stairway at the end of the room.
Crawl through the vent shaft and collect the bradnailer in the maintenance room. Leave it and kill the alien slave. Down the hallway you can see the rubble from the collapse of the hallway one map earlier, so turn right into the "biology" section. If you're having trouble in killing the two spawning alien grunts, follow this guide: enter the room but not too far yet (not further than the first table). Throw one pipebomb into the 2nd part of the room (you may need to "jumpthrow" it) and one into the left part of the room by clicking the right mouse button to throw it (instead of the left button which would detonate the first one). Now walk through the trigger which activates both portals (somewhere around the edge of the table) and immediately run out of the room again. Wait until both grunts have spawned and detonate the pipebombs. This should've done the job :)
Back in the "biology" room again, search for the "Darwin" book in a bookshelf at the end of the room and press it. This will turn the bookshelf left to you and reveal the secret entrance to the Poke646 bunker. Get the medibox from the crate and enter the keycode. Approaching the elevator will unfortunately make it collapse so you need to get down their by letting yourself fall from ledge to ledge. Make sure to only take one ledge each time, otherwise you'll lose too much health. Once you're down, leave the elevator shaft and walk towards the bunker.
Map 7
The bunker layout seems to be confusing at first, but it is pretty simple once you get hold of it. Follow the hallway into the first larger hall and get your briefing at the IU. You don't need to try to get into the "astrolabs" to your right, this requires a "level 4" authorization which you won't get (maybe the sequel will reveal what's behind that door? :)). Once you read the briefing, you have a "level 2" authorization which opens the door to your left, leading into the "research" area of the bunker. Follow the hallway (don't enter the "Xen lab" yet) and turn right at the end, follow the hallway once more and once again turn right at the end. This should lead you into the "supply" room in which you find boatloads of weaponry and mediboxes.
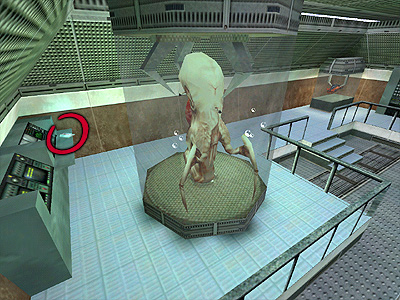
Walk back the path you came from and enter the "Xen lab". Kill all enemies and get the "level 3" authorization card which can be found here:
Leave the Xen lab through the door next to the headcrab incubator and walk straight down the hallway (don't turn right at the T-intersection). Turn right at the end, this will lead you into the generator room. The power for the generator is already activated, just hit the switch and leave the hall through the door to your left. There's another little supply room to your right in which you'll get your next briefing. Leave the room (there's some more ammo in the shelves) and walk towards the elevator which will load the new map.
Chapter 4: Eastend
Map 1
Back on the surface again, you'll have to get rid of 3 zombies first. Follow the backalley to a small lawn, now lean back and watch the scenery, it's the "Garg show" playing tonight :) While he does his scripted sequences (read: until he finally leaves the scene again) he won't attack you, so you don't need to waste ammo on him (you won't be able to kill him anyway).
(Note: I received mails from people asking whether I'm making fun of the "They Hunger" series with my cinema sign... you couldn't be more wrong! Neil and I became good online friends over the past year and this sign is meant as a hommage to "They Hunger" as it still is the most thrilling singleplayer stuff available for HL. But unfortunately it is just like Neil says on his website: "this sign is the closest people will ever get to seeing TH4". *lol*)
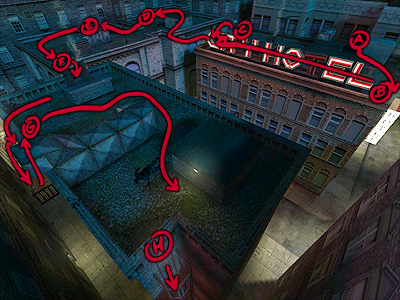
The way out of the upcoming situation seems to be the No.1 hanger for all Poke646 players, so I'll try to explain it with the most possible detail:
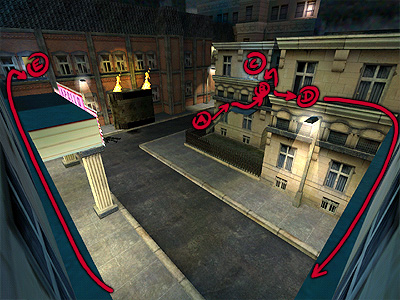
First off: DO NOT follow the main road to the Gargantua, otherwise you will have to load a saved game since he won't give up until he burned you to death. Leave the fence through the hole that the explosion of the lamppost caused (A) and get your IU briefing first (the IU is behind the tank). Ok, so you need to get into the subway, here's how to: walk up the lamppost (A) and get onto the small roof (B). Jump onto the ledge and enter the window (C). Read the note on the table to get the info on how to open the attic hatch in another building. Be careful when leaving the room again through the window, 2 alien controllers will spawn right in front of your face!
Now jump onto the ledge on the other side of the building (D) and follow it until you reach the 2nd window (E). Enter the corridor and turn right, an alien grunt will spawn. Once you managed to kill him, enter the room leading into the attic. Collect the nailgun and enter the attic (this wouldn't be possible if you didn't read the note in the other room), the key to the appartment lies behind a crate at the very end of the attic.
Leave the attic and enter the appartment No. 21. Smash the small cupboard to reveal a vent grate, smash it and kill the alien slave behind the lower exit. When leaving the vent duct, be careful to not touch the water, it is electrified and will kill you immediately. Leave the building through the backdoor and kill the headcrabs. Down the backalley you can find an electric box with a switch, hit it and watch the Garg burn (revenge is sweet, ain't it?). Another electric beam from the cable will also strike on the subway door lock and open it. Leave the backalley through the fence door, after killing some more alien slaves you will be able to enter the subway and leave the map.
Map 2
Follow the route down to the ticket check but don't walk too far towards it yet: if you snipe them from a distance, the Poke646 soldiers won't even notice you. Jump through the ticket check and find yourself a strategy to kill the other 3 soldiers. Here's mine: Sneak around the crates and kill the first one to the left with a shotgun blast. This will alarm the others, run and hide behind the crates again and let them come to you. You might also throw a pipebomb right between the two large posters on the opposite wall, this will kill the 2 soldiers waiting there and the last one to your left shouldn't cause problems anymore.
Get the stuff from within the crates, refresh at the soda machine and proceed to the "to the trains" intersection. Turn right and destroy the sentry gun downstairs. You are not able to get any further here so walk back and destroy the sentry on the other side. Smash the crates for a shotgun and turn right towards the train. Approach with caution, two soldiers wait at the end of the platform, but 2 rifle bolts should do the job. Refresh at the soda machine to the right and walk towards the hidespot of the soldiers. There's another sentry gun built up on some crates, be aware of that one. Connect to the IU for another briefing.
Now you know that you need to reach the other platform, here's how to: Throw the switch to ignite the dynamite and blast the door. Jump over the crates and enter the room. Pick up the keys on the board (these will open the restroom doors) and read the note. Now you know that there must be something about the microwave, but for now it doesn't work since there's no power inside of the station. Leave the room again and enter the restrooms at the end of the platform.
Kill the barnacles, walk downstairs and kill the slaves with a pipebomb. The restroom doors are locked so you need to find another way in. Walk upstairs again and jump onto the small ledge with the vent grate. Smash it and crawl through it until you reach the restrooms. The fart noises should've already alarmed you that there's a soldier down there. Get rid of him and collect his buckshot ammo from the toilet (does the office on the magazine cover remind you of any place you know?). Leave the restroom through the door on the other side and make your way up again.
Once you've reached the other platform, you need to get rid of the 2 soldiers guarding the "main power control" room. Once you entered the control room you need to kill 2 more soldiers before you can activate the power supply for the station. Make sure to collect the goodies in the back of the room and head back to the platform.
Walk over the beam at the sentry (make sure to smash the crate to the left as it contains a rifle) to get back to the other side of the station. Aliens slaves have spawned meanwhile, 2 of them await you upstairs. Walk down the other side again, you'll see that the electricity caused the water on the floor to be electrified, no way to get into the train this way.
So walk up to the end of the platform and enter the staff room once again. Now that the power is enabled, activate the microwave and run back the corridor to duck for cover. The malfunction in the microwave causes it to explode and blasts a hole into the wall. Step through it and smash the vent grate at the end of the corridor. You'll end up in front of the restrooms again, head back up the stairs to get onto the train platform again. One more alien slave is awaiting you, after you killed him you can enter the locomotive of the train. Time to get that damn thing rolling!
Map 3
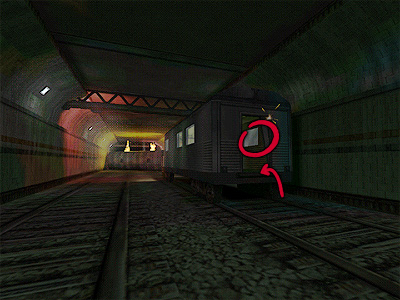
Walk up towards the front of the locomotive, a portal will open and spawn a headcrab (while also destroying the train controls). Once you got rid of that one, collect the health and connect to the IU (which is the train radio system in this case). Your briefing will tell you that there's not much time left to leave the train, so you better hurry up!
After the doors are unlocked, enter the first wagon and kill the 2 spawning slaves. Let the train door at the right end of the wagon open and take a glimpse outside. There's a trainlight passing by frequently, try to get its rhythm and make the jump to the next wagon when it can't hit you. Stay crouched behind the seats and prepare to kill the bullsquid at the end of the wagon. There's a Xen Squasher beside it, leave the wagon to the left door at the end.
On this side there's two obstacles to avoid: one standing and one hanging light. the hanging light passes when you are crouched, but the standing one will hit you haaard. So time your jump to the next wagon and enter it.
The door at the end won't open as it is damaged, so you need to get onto the roof of the train. Once you try to climb the ladder, a houndeye will spawn behind, kill it and proceed to the roof. There are several headcrabs on the roof, try to kill them while you are still on the ladder, this makes it much easier once you're on the roof itself.
The beams that pass by on the roof have a repeated rhythm, too. Try to learn it before you approach: you can crouch beneath the beams, but the hanging lights will hit you if you don't strafe to the right side. Proceed to the end of the train, jump from wagon to wagon by hitting the jump key in the last second and crouch to land. On the last wagon there's an alien grunt waiting for you, kill him from the roof before you let yourself drop down onto the last wagon.
This one caused many people to get stuck within the game (I'm truely sorry for that), although it's not hard to proceed if everything is done right: stand in exactly the same position as in the screenshot above before you shoot the clutch. If you stand upon a handrail, the machine or anywhere else, you will get stuck at the start of the next map.
(Note: This is due to the extremely complex usage of entities to get the trainride to run at all. The Half-Life engine just isn't designed for this but I really wanted to have the trainride in the game, so please forgive me on that little bugger :))
Map 4
Once you leave the train, walk up to the end of the wagon until you hear the ceiling collapse. Get yourself some cover and get rid of the alien grunt who happens to fall through the floor.
The screenshot shows the backdoor to the wagon, make sure to enter it for some goodies inside of the crates. Leave the train tunnel through the side door and kill the bunch of houndeyes. Walk upstairs, kill the barnacles and open the door to the train station. There's 3 soldiers waiting for you, make sure to have a strategy before you get into contact with them :) Leave the train station through the path to the right and avoid the explotoad while jumping the ticket check. Leave the map by following the hallway.
Map 5
Get rid of the 2 alien controllers from inside the subway entrance with the bow rifle and leave the subway station. Inside of the container to your right you'll find some stuff, head left for your first real combat in this map. Kill the alien slave to your left and get ready for the 2 alien grunts. They're busy eating so you can kill one of them easily with any kind of weapon. Once you got rid of the 2nd one, surround the industrial looking building to your left for some nail ammo beneath the lantern. At the end of the backalley left of the hotel, you'll find a medibox (attention: headcrab!).
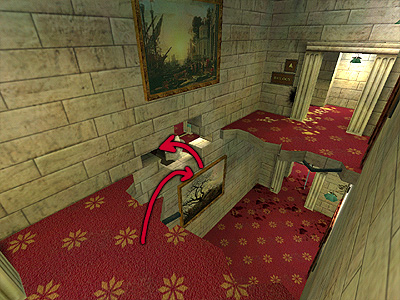
Follow the main road and surround the hotel. A bunch of houndeyes will come running at you. In a small backalley to the right you'll find some candy. Follow down the main road to the end for a shotgun right in front of the barricades. Get back to the hole in the fence beside the hotel. Walk through it and smash the left crate to make it possible to push the crate behind it. Position it in front of the broken fireladder and climb up. Enter the hotel and prepare for the alien slave down the corridor. Pick up the keys from the lady corpse and enter the room No. 11.

This painting is obviously a montage: it shows the Poke646 team in all its beauty :) From left to right: Ryan "Major Clod" Veenstra (weapon models and end boss), Andreas "Cybermessias" Buske (help with conception and storyline), Sebastian "Steini" Steinlechner (coding), Marc "Term" Schröder (project leader, head mapper and all the other stuff) and finally Thomas "G.I.Joe" Pecht (NPC modelling). Smash the painting to open a secret door with some rifle ammo which you desperately need for the upcoming rooftop fights.
Leave the room through the backdoor, collect the nailgun and climb up to the rooftop (A). By now the helicopter has already dropped down 2 soldiers on the opposite roof, as soon as they can see you, they'll start throwing grenades, so you need to hurry up. Get in position near the hotel sign (B) and use the rifle to get rid of the soldiers, you might have a better chance if you hide behind the huge letters. Pass the letters to get to the other side of the rooftop (C) and let yourself drop down to the window in the industrial building, smash the wood panels to get in.
Refresh at the soda machine and approach the next rooftop (D), you will already hear the helicopter again, this time dropping another 2 soldiers at the end of the rooftop. Make sure to collect the goodies behind the vent (E) and jump down to the large advertisment on the wall (F). Surround the building and climb the fireladder onto the last rooftop (G). 2 last soldiers have been dropped down on the 2nd rooftop, if you're having problems in killing them you should run to the end of the rooftop first. Follow the route on the screenshot so you won't miss the 2 pipebombs and both mediboxes. If you're at the end of the rooftop, you're out of reach for the soldiers and can easily snipe them down. Leave the rooftop by using the fireladder (H) and leave the map by entering the open door of the opposite building.
Map 6
Leave the building and connect to the IU in the van first. Ok, so you're nearing the end, time to get stuffed for your last couple of firefights. Smash the surrounding crates for goodies and leave the backalley. A bunch of houndeyes will come up, kill them and turn right first. Turn left again, follow the route to the small ladder leading to a platform and get rid of the 2 headcrabs there. Climb the ladder and throw the switch. This will bring the crane into a position so that you can leave the area from the other platform.
To get there, walk back, surround the building (kill the 2 zombies if you haven't done so before), collect the nailgun and walk into the other route leading to the harbor docks. While approaching the 2nd ladder you can already hear the battle begin. Climb the ladder and watch "good vs. evil" through your scope. You can interfere whenever you want to, there are 2 explosive barrels on the other side of the dock which should help you save ammo. Once the battle is over you should clean up the remaining enemies and leave this side of the dock.
Jump on the handrail, from there onto the hanging crate and over the wall. Get down into the water and swim across the dock to a ladder near the 2 pipes. As soon as you climbed the ladder, 2 soldiers will spawn on the crane platforms. You can easily run out of their reach and snipe them down, but don't forget to collect all goodies on this side of the dock.
(Tip: If you're really low on ammo, you can swim back after killing the 2 soldiers on the platforms, they leave a shotgun and a rifle. Climb the crates beside the wall to get into the crane area again.)
The 3 mediboxes on the harbor dock should get you prepared for the next task. Enter the door and walk straight up. There's a first soldier behind the container to the left, kill him and run towards the large lamppost. You will notice the radioactivity, but if you're fast enough this won't really hurt you too much. There's another soldier in the middle of that area, kill him and jump the crates at the barrel to get behind the containers. Turn right 2 times (facing another soldier) and you're out of the radioactive zone again.
Surround the warehouse and you'll see what Dr. Fuller meant with "the staff has charged tripmines". Jump the first one and crouch beneath the 2nd two. Jump the crate to get over the next pair. Surround the fenced generator and jump the crate to get onto the ledge of the building to your left. Walk on it to get past the next set of mines. Jump the stack of crates and smash the vent grate to finally get into the warehouse.
First off: don't use explosives or the Xen Squasher to destroy the sentry guns in this part, your best bet to survive this is to use precise handguns.
Jump the first mine and immediately crouch behind the small crate (A) because the sentry (B) will start to unload its ammo. Once you got rid of that one, jump the small crate and over the next two mines (C). Surround the stack of crates (refresh at the soda machine if necessary) and destroy the sentry in the corner (D). Jump the crates at the garage door to get over the next set of mines, there's another sentry behind a stack of crates. Jump the smaller crate beside the door to the fenced generator to avoid the last couple of mines. Walk outside.
Kill the headcrabs and search for the notes of the scientist, read them. Oh, it looks as if you were fighting on the wrong side the whole time, eh? However, time to show them Poke646 bastards how tough you really are... time for Xen!
Get back into the warehouse and enter the restroom door. After reading the notes you're able to activate the teleporter now, walk into it and watch the teleport process first hand (I bet you always wondered how that would look like?).
Epilogue: Xen
The cave jump puzzle seems to be hard at first glimpse, but since there's low gravity on Xen you shouldn't have any problems in getting to the top of the cave. If you don't seem to gain enough height in the jumps, press the crouch key while you're in the air and land this way. Once you're up in the small cave, refresh health in the healpod, you'll need it. Step into the teleporter.
Defeating the end boss is much easier than most people think, it just demands some skill and courage: the only way to get past him is to run into him. Once you're on the asteroid, run up straight to the electric fence and jump it (A). The robocop (that's how we call him in the team) will have turned towards you and should stand right in front of you when you land (B). Immediately jump again and press the forward key when he hits his fist into the ground, the earthquake should throw you far across the map into the right direction (C). Jump the fence on the other side and hit the switch to overload the electric field (D). This will hit the Robocop and destroy the Poke646 receiver. Lean back and watch the endscene and the credits scroll by.
Congratulations, you successfully completed Poke646!